- Tech
- No Comment
How To Reduce Image Size For Your Site

In the digital age, visuals are paramount, and images play a pivotal role in engaging website visitors. However, high-resolution images can slow web pages, frustrate users, and harm your site’s SEO rankings. To strike the right balance between visual appeal and website performance, understanding how to reduce image size for your site is crucial. In this comprehensive guide, we’ll explore image file types and compression techniques, provide methods for effectively reducing image file size, share best practices for optimizing images for the web, and conclude with references and additional resources.
Let’s begin to supercharge your website’s performance and user experience.
Understanding Image File Types and Compression
Before diving into the methods for reducing image size, it’s essential to grasp the basics of image file types and compression.
Image File Types
- JPEG (Joint Photographic Experts Group): JPEG is the most common image format for photographs and complex images. It offers a good balance between image quality and file size.
- PNG (Portable Network Graphics): PNG is ideal for transparent images or sharp edges, such as logos and icons. It provides lossless compression, preserving image quality but resulting in larger file sizes.
- GIF (Graphics Interchange Format): GIFs are perfect for simple animations and images with few colors. They have limited colors and are best suited for tiny, animated graphics.
- WebP: An emerging format developed by Google, WebP provides both lossless and lossy compression, making it an efficient choice for web images.
Compression Techniques
- Lossy Compression: This method reduces image file size by discarding some image data. JPEG is a prime example of a format that uses lossy compression. It’s effective for photographs but may lead to some loss of image quality.
- Lossless Compression: Lossless compression retains all image data while reducing file size. PNG is a popular choice for lossless compression, ensuring high image quality.
Methods for Reducing Image File Size
Now, let’s explore practical methods for reducing image file size without compromising quality.
- Choose the Right File Type: Select the appropriate file type for each image. Use JPEG for photographs, PNG for transparent images, and WebP for modern web compatibility.
- Resize Images: Resize images to match the dimensions required on your website. Avoid uploading large photos and relying on HTML or CSS to resize them, as this increases load times.
- Use Compression Tools: Utilize image compression tools and software like Adobe Photoshop, TinyPNG, or ImageOptim to compress images before uploading them to your website.
- Enable Browser Caching: Configure your server to enable browser caching. This allows returning visitors to load images from their cache, reducing load times.
- Lazy Loading: Implement lazy loading to load images only when they are in the user’s viewport. This significantly enhances initial page load times.
Resizing Images to Appropriate Dimensions
Resizing images to fit specific dimensions is a practical approach to reducing their file size. One user-friendly tool for achieving this is AbstractAPI, an online service that facilitates replication resizing via a REST endpoint, providing access to resized images through JSON responses.
AbstractAPI offers a free tier that allows monthly uploads of up to 100MB at a rate of one request per minute. To get started, you’ll need to sign up with your email and password to obtain an API key, which grants access to the endpoint for a lifetime without any cost.
To utilize AbstractAPI effectively, send a POST request to the designated endpoint, including a data object with essential details: your API key, the URL of the image you wish to resize, and specific resize options.
The data object should be structured as follows:
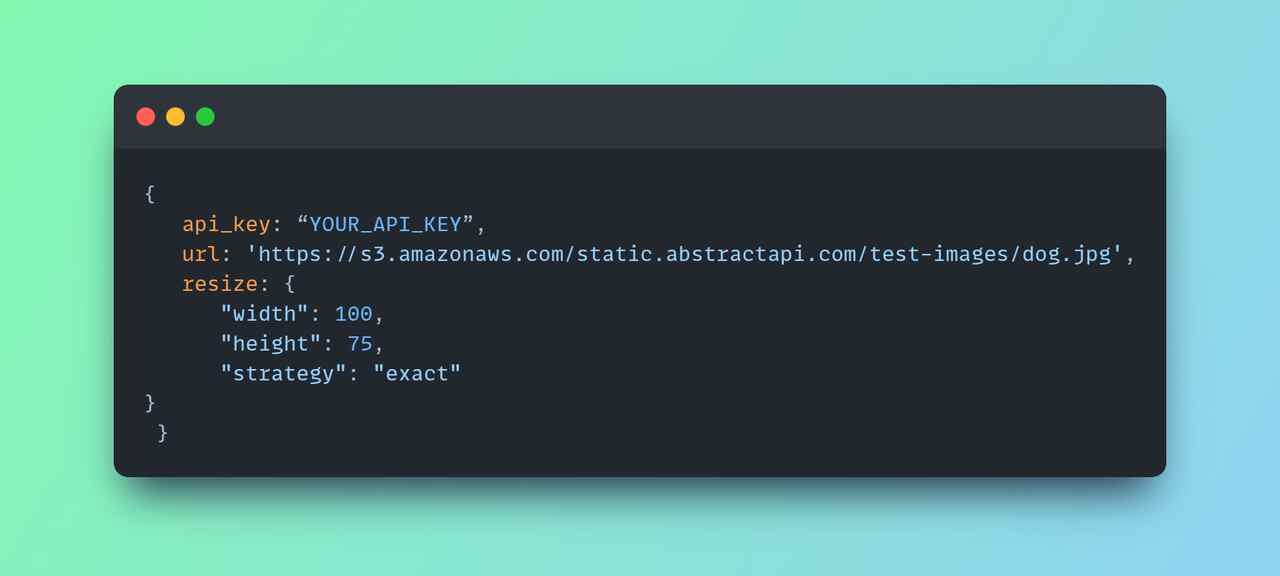
These resize options instruct the API to adjust the image to the specified dimensions. Alternatively, depending on your requirements, you can choose from various strategies such as landscape/portrait, auto, fit, and crop.
For instance, if you were making this request from a React application, it might look something like this:

Upon making the request, you’ll receive a response containing valuable information about the original and resized images and a link to the resized image hosted in an S3 bucket.
Here’s an example of the response you can expect:


AbstractAPI streamlines the image resizing process, providing a convenient solution for optimizing images to meet your website requirements.
Best Practices for Optimizing Images for the Web
To ensure your images are web-ready, follow these best practices:
- Maintain Consistency: Keep your website’s image sizes and formats consistent for a cohesive look and feel.
- Use Descriptive File Names: Rename image files with relevant keywords to improve SEO and accessibility.
- Alt Text: Always include descriptive alt text for images to aid visually impaired users and enhance SEO.
- Responsive Images: Implement responsive design principles to serve appropriately sized images based on the user’s device.
- CDN Integration: Use a Content Delivery Network (CDN) to distribute images from servers closer to the user, reducing latency.
Conclusion
Efficient image optimization is an integral part of website performance and user experience. You can reduce image file size while maintaining image quality by understanding image file types and compression techniques and employing effective methods. Remember to follow best practices to ensure your images are web-ready. Implement these strategies, and your website will load faster, engage users better, and improve SEO rankings.
For a comprehensive guide on setting up your website, including optimizing images, check out our article on How to Install WordPress, the Definitive Guide.
References and Additional Resources
- Google PageSpeed Insights
- ImageOptim – Image Compression for Websites
- TinyPNG – Compress PNG Images While Preserving Transparency
- Adobe Photoshop – Image Compression
FAQs
Q1: Are there any online tools for image compression?
Ans: Several online tools like TinyPNG, JPEG Optimizer, and Compressor.io allow you to compress images without software installation.
Q2: How do I check the file size of an image?
Ans: You can check the file size of an image on most operating systems by right-clicking the image file and selecting “Properties” (Windows) or “Get Info” (macOS). In web browsers, you can use the built-in developer tools to inspect image properties.
Q3: What is the ideal image format for logos and icons?
Ans: For logos and icons, PNG is often the perfect format due to its support for transparency and sharp edges.
Q4: Does image compression affect image quality?
Ans: Yes, image compression, especially lossy compression, can somewhat reduce image quality. Finding the right balance between image size reduction and acceptable quality for your specific use case is essential.
Q5: How can lazy loading benefit my website’s performance?
Ans: Lazy loading delays the loading of off-screen images until the user scrolls to them. This can significantly reduce initial page load times, improving user experience and speed.